Do you find yourself spending too much time on social media just to schedule, look for content to share and running out of time to actually write new blog posts? In this post, I’m going to share with a great way of using RSS feeds to automate social media scheduling. It’s not just common RSS feed integration, the way we are going to to the things will let you get back some of the traffic back to your blog. Sounds great? I bet it does!
In the previous post, I shared 8 social media marketing tools to automate and make social media scheduling quicker, in this post we are going to look how to use Snip.ly and a scheduling tool of your choice (Hootsuite or Buffer), to not only schedule your social media updates quicker but also to get some traffic back to your website from the content you share from other blogs.
Let’s get started and find out how to use RSS Feeds from blogs in your niche to automate your social scheduling.
Disclaimer:
*In the spirit of full disclosure, this post contains affiliate links, which means that I may get a commission if you decide to sign up for some of the mentioned services. I only recommend tools I love, and would still recommend them if they had no affiliate program available.
Find Content You Want to Share on Social Media
If you’re not familiar with your niche, it’s time to get to know them. Let’s find some influencers and resources that share great stuff your readers will love to read.
But before we begin, it’s good to find answers to a couple of questions:
- Do I want to send traffic to the specific blog post, landing page or homepage?
If you know the answer to this question, that’s great! It won’t only help you find perfect content to schedule, it will also help you gain more visitors to your site by sharing better-targeted content. - Do I know the “big players” in my niche?
We are talking here about great places that constantly share great content in your niche. Think of your competitors, influencers or your blogging friends that target same people as you do.
If you don’t know the answers to this question here are a couple of things to help you answer this questions…
Some help to find an answer to the first question, “which page should I promote…”
If your blog is quite fresh and you don’t have much of a traffic yet, you don’t have dedicated landing pages or a blog post that you really want to expose. Don’t worry, just start by sharing your homepage. If you decide to change it, it’s all editable so there is nothing to be scared of. There is always time to create a beautiful landing page later on as well.
If you don’t want to send them to your homepage or you don’t have a landing page designed yet, you can always check your web analytics account (you have one right?) and see what content is performing best. You may also feel like you have some great content that has never been discovered, why not to use it? You will be able to send traffic to different pages, so play around, brainstorm and see how it works for you. You can go back anytime and change the pages you’re sharing so it’s good to play around.
How to find great content to share…
I would recommend creating a spreadsheet for that, it will help you to create a list of great resources from your niche. A file may contain their social profiles and also what social sharing buttons they have on their pages.
Every blog must have its RSS feed, otherwise we will not be able to populate their blog posts.
It’s also important to keep in mind that if someone’s blog post doesn’t have social sharing button to share it on Twitter, we should not be sharing it on Twitter. It applies to any social media channel and it’s something important to keep in mind.
Let’s Create Spreadsheet with Great Blogs We Want to Share Content From
Let’s create a spreadsheet file so we can save all the important details in it. Personally, I use OpenOffice for that as it’s free, you can use Google Docs Spreadsheet or your other favorite tool.
As an example here, let’s say I’m a yoga teacher and I’m looking for some great yoga resources to share with my followers…
Google is a great search engine, so let’s head there and find some great resources about yoga. You can perform searches like “yoga blog”, “top yoga blogs”, it’s easier than you think.
When you’re looking for RSS feed of a blog, many of them share their feed with their social media profiles, however, if you have a hard time to find it, you may want to use these tricks to find them:
- Just add “feed” after the domain or blog subfolder, as some websites have blog section in a subfolder
- Example: websiteurl.com/feed/, websiteurl.com/blog/feed/, websiteurl.com/rss/feed.xml
If you cannot find it, you can also ask google for help… sometimes searches like “domainname.com RSS feed” will return you result with RSS feed for specified blog; sometimes you have to accept the fact that some websites do not have RSS feed.
Surprisingly, some blogs won’t list their social profiles on the website. Again, just use google to help you find out if they are active on a specific social network, just search for “domainname.com twitter”. If searched website has it’s Twitter account, there is a big chance that first result would be it’s Twitter address.
Do I really need spreadsheet for that?
No, you don’t! You can perfectly follow these steps without having to create spreadsheet file. You may just go to a blog of your choice, find it’s RSS feed and you can move on to the next step…
However, I prefer to create the file and grow the list with time so I have the list of great resources about my niche. File like that can help you in the future in many ways, but for now it’s up to you if you want to create it or just skip to the next step of Adding RSS Feed to Snip.ly Tool.
If you are planning to stick around for a bit longer, here is the spreadsheet file with yoga blogs and some additional information about each blog:
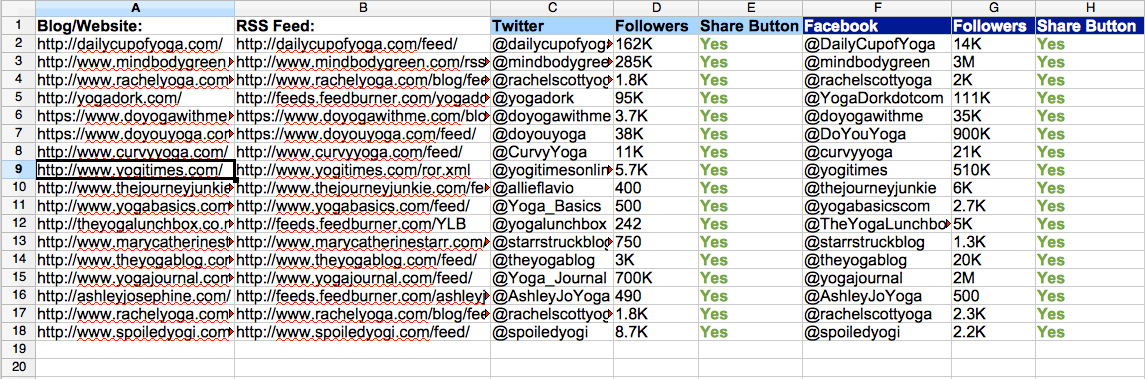
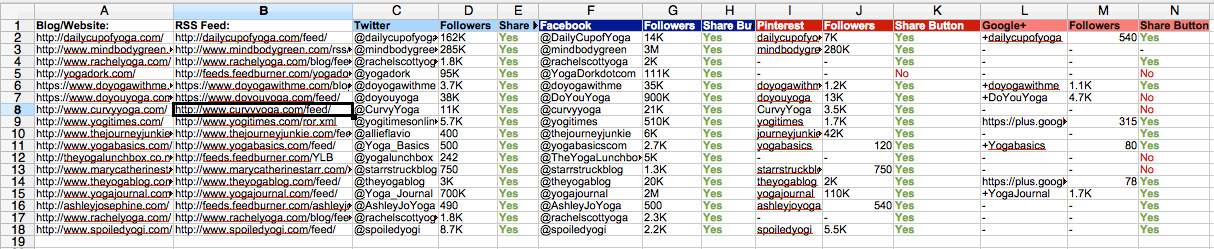
By examining the file you will quickly notice that I save information such as website address, it’s RSS feed and some details about their social media channels. You may want to add also Pinterest, Google+, Linkedin or any other social media profile. For scheduling, we will simply use Facebook and Twitter.
Social handle (@): I also included each website name on each social media platform, cause whenever I share something on, let’s say Twitter… I want to have a Twitter handle of the profile in hand, and this file will be a great help to accomplish that.
Number of followers: Important or not, it’s something good to have in mind especially if you hope they will retweet you to their followers. On the other hand, profiles with fewer followers may appreciate more when you tweet something from their sites.
Share button: I add information if website contains sharing button for specific social media platform. I might be wrong here, but I believe I’m right -> You should only tweet someone’s post if they have “Share button” for Twitter. Most bloggers that do not have the button added most probably will still be happy for you sharing their content however, some might not want to have their content shared.
Let’s move on and let’s set up Snip.ly account. The tool that does “magic”, letting us share other blogs content and by doing that we can get some extra traffic back to our own blog.
Setting up Snip.ly & Adding First RSS Feed
If you already have your Snip.ly account, just log in, if not you can signup here for a free Snip.ly account. Free account it’s a perfect place to start and it lets you receive 1000 clicks per month to your website, and that’s just AWESOME.
If you’re not sure how Snip.ly works here is a quick video that will explain just that.
If you don’t want to watch it, or just can’t at the moment. Here is a quick explanation how Snip.ly works.
It lets you share content from other blogs on your social media (or blog post) with your own call-to-action. Once a reader clicks on a link, it will go to someone’s blog post and see your call-to-action as an overlay on the bottom of the page.
Snip.ly also works with RSS feeds and here we are going to use this unique feature.
Here are three snapshots of the left sidebar of Snip.ly website, showing where “brand profile”, “call-to-actions” and “RSS Feeds Integration” are located.

Once you’re logged in:
- Create your “brand profile”, where you simply add your blog/website information.
- Create your first “call-to-action”, or more than just one. Each call-to-action can have a different message and point to a different page on your website.
In this step you will have to make a decision on Sniply type you will use if you want your call-to-action as a button or plain link, or maybe you want to have it hidden in case you just want to use it for retargeting and analytics.
You may want to use a “Form” to collect e-mail addresses or use an “Image Ad”. Both of these options aren’t accessible under a free Snip.ly plan. However, you can upgrade anytime you want.
Under a CTA tab on “call-to-action” panel, you decide on the message, button text and an URL of a landing page on your blog where you want to send traffic to.
Customization tab lets you decide how you want your link to be shown on a page, check the options and choose an option you like the most.
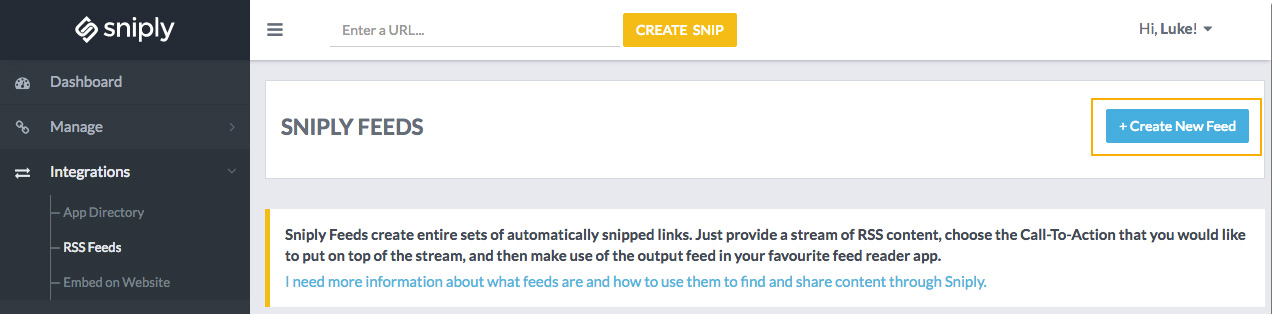
- Now it’s time to integrate our first “RSS feed” to a call-to-action created in previous step.
After heading to “RSS Feeds” Integration, we simply click a button to “+Create New Feed”.
Choose a call-to-action button, copy and paste the RSS feed of the blog you want to use content from and click “Create Feed” button.
The RSS feed URL should look something like this:
http://snip.ly/dashboard/rss/gen/UNIQUECODE
You can use this newly generated feed in various social scheduling tools, here we are going to add it to our Hootsuite and Buffer.
Adding Snip.ly Generated RSS Feed to Hootsuite
If you don’t have a Hootsuite account, here you can sign up for one. A free plan is a great place to start, and it’s good enough not only to test it out but also to use if your social media scheduling needs aren’t that big.
Hootsuite’s free plan allows you to integrate 2 RSS Feeds, manage up to 3 social media profiles. I would say that’s awesome for a free account. Professional plan, on the other hand, lets you integrate an UNLIMITED amount of RSS feeds. It sounds just AWESOME.
If you have an account, just log in and if you don’t don’t be afraid to sign up for one. Add your social media account, and now we are ready to add our RSS Feed.
Let’s integrate it. Snapshot here shows how RSS Feed integration form looks like and, it shows where it can be found in the sidebar of the Hootsuite dashboard.

Click on the “+” button to see this window.
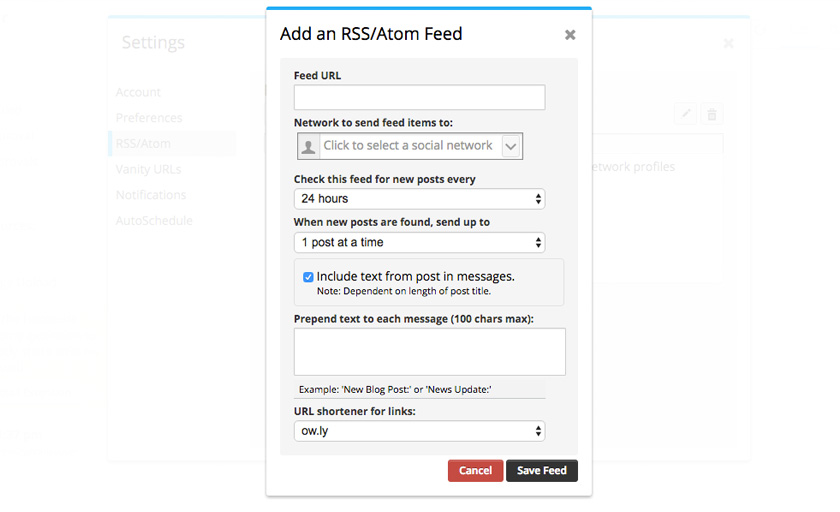
Just paste and copy URL of the feed generated by Snip.ly tool into “Feed URL” field. Choose the Social Network you want to use it. Decide on how often you want the feed to be checked for new posts and how many posts you want to have published per day. You may want to play with the settings, depending on how often a blog you’re sharing content from is publishing new blog posts. All the settings can be edited, so I wouldn’t stress it. Check it from time to time and see how it works for you.
How to Add Snip.ly RSS Feed to Buffer
When it comes to Buffer, it’s important to know that it doesn’t allow RSS feed integration under the free account. Personally, I’m subscribed to “Awesome” plan, it allows me to add up to 15 RSS feeds per social media profile (up to 10 profiles). By now, you can probably imagine how great it can be!
Anyway, if you’re also under “Awesome” plan or thinking to upgrade it, here is how to integrate Snip.ly generated RSS feed to a social media profile of your choice. You can sign up here for Buffer account.
Log in to your account, choose your social media profile in the left sidebar and here is what we get:
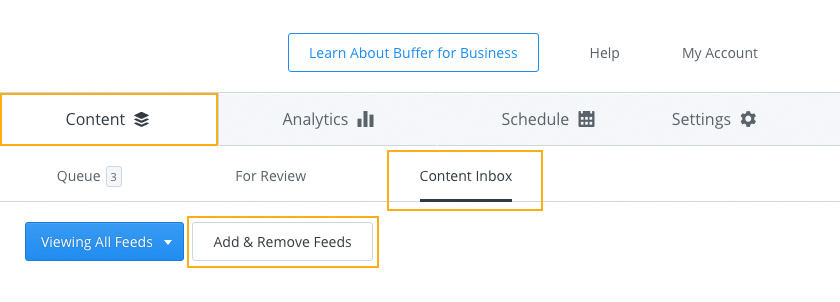
Just go to “Content” tab, choose “Content Inbox” in the secondary tab and click on “Add & Remove Feeds”.
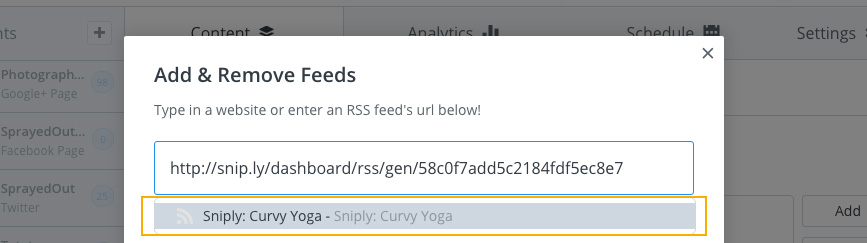
Copy and paste RSS Feed from Snip.ly generator and it will quickly populate the feed. Just click on a link in the orange box and your feed will be added.
After adding several RSS feeds here is how your populated content will look this:

Now, you just need to click on “Add” button next to an update you want to schedule, edit a message if needed, add some hashtags and Twitter handle (@) of the profile you’re sharing content from and you are ready to go!
That was easy, right?
Some Extra Social Media Scheduling Tips to Keep in Mind
So far I shared with you how to use Snip.ly, it’s RSS Feeds integration module and how to use it with your favorite social scheduling tool. Here I share some extra tips to make your work easier, more fun and enjoyable in the future:
- When you’re sharing other people content on social media, don’t forget to add some hashtags, they will help you gain some extra exposure.
- Use Twitter handle (@) when sharing content from your favorite blog, who knows… they might want to retweet it, sharing it with their followers or at least they will know you’re sharing their stuff. They will certainly appreciate it.
- Create a spreadsheet with influencers, blogs and competitors in your niche. It will be useful in the future in many ways: you may want to have a quick access to their social profiles handles (@) when sharing their content, quick access to great resources to quickly check what’s new and what to share on Twitter, Facebook, Pinterest and other social media platforms, and many more.
- You may run your social media scheduling using free accounts however, the paid versions offer you more flexibility and they will save you more time, so consider upgrading your account as it should benefit you in the future.
Just because I have mentioned about spreadsheet file quite many times in this post, here I decided to share just one more snapshot of the same file. Just to show you more social media profiles I decided to save from each blog, it’s a big time saver for everyday job.